
Introduction
Everbility Therapist Checklist
Looking for an all inclusive guide to help you get started with Everbility? Our Everbility Therapist Checklist will help you get the most out of Everbility.
💻 Navigating the Dashboard
Understand how to access the different parts of Everbility with clarity and intention.

(1) 🗂️ My Clients
Putting people at the centre of your care.

(a) I can easily add a new client, service provider, or workplace here, ensuring accurate and accessible records for my use.
(b) I can quickly find clients through smart filtering with the search bar.
(c) I can use AI shortcut buttons by clicking Writer or Assistant next to their name.
(d) I can view all of my client data (from session notes to completed Everbility documents) all in one place via Client Data. Think of Client Data as your client's folder on Everbility.
Once clicking on the 'Client Data' button for your client, you can find a series of tabs under your client's name.

Context: Includes any raw information about the client. This might be a diagnostic report you uploaded as a pdf, a brain dump you typed into Everbility, a transcription you created when you recorded a session or information from a Word document that you copy and paste into Everbility.
Documents: Consists of anything you generate in the Everbility tool called Writer. This may be an assessment report, a clinical note, team meeting minutes or something else!
Conversations: Consists of any conversation you have with the Everbility tool called Assistant. This may be brainstorming therapy ideas, session planning, asking particular diagnostic questions or something else!
Recordings: Includes the list of audio recordings, if you have chosen to store recordings onto your device when you click the transcription microphone. (This is labelled '3' in the below image)
(e) I can keep my caseload relevant and tidy by deleting clients when appropriate.
(2) 🟣 Purple Side Menu
Finding your way around Everbility.

(a) I can streamline navigation by expanding or collapsing the side menu.
(b) Under Personal, I access templates and knowledge unique to my practice.
(c) Under Organisation, I collaborate with colleagues through shared clients, use shared templates, and shared KnowledgeBase. If I'm not a part of an organisation, I will not see this section but I can create one.
(d) Under Tools, I can choose how I work with AI:
- Assistant: An AI chatbot I can use to ask questions, brainstorm therapy ideas, find research, retrieve client information, session plan, set therapy goals, and write brief text for documents.
- Writer: A tool that converts raw captured information (transcriptions, brain dump notes, PDF uploads, bullet points) into structured documents (SOAP notes, clinical notes, GP letters, assessment reports, case reviews, etc.).
(3) 👤 My Account
Customise your platform so it works the way you do.
(a) To access my account, I can click on the user icon in the top right corner.


(b) I can manage my subscription here.
(c) I can personalise how AI supports me (including client merge tags) here.
(4) 🧭 Reaching Out to Everbility Support
You’re never alone in learning.
(a) I can click on Help & Resources to ask questions, contact the Everbility team, book a demo, or access step-by-step guides.

Quick Start Guide
📝 Use Writer to Generate a Report
Write high-quality reports with less effort, more impact.
(a) I can collect raw client information on Everbility by:
- Typing directly into the Notes section (auto-saves as I go).
- Uploading PDF documents using the Upload Data icon.
- Transcribing voice notes using the Microphone button.

- Examples of helpful background information: diagnostic reports, therapy assessments, meeting minutes, or case conference notes.
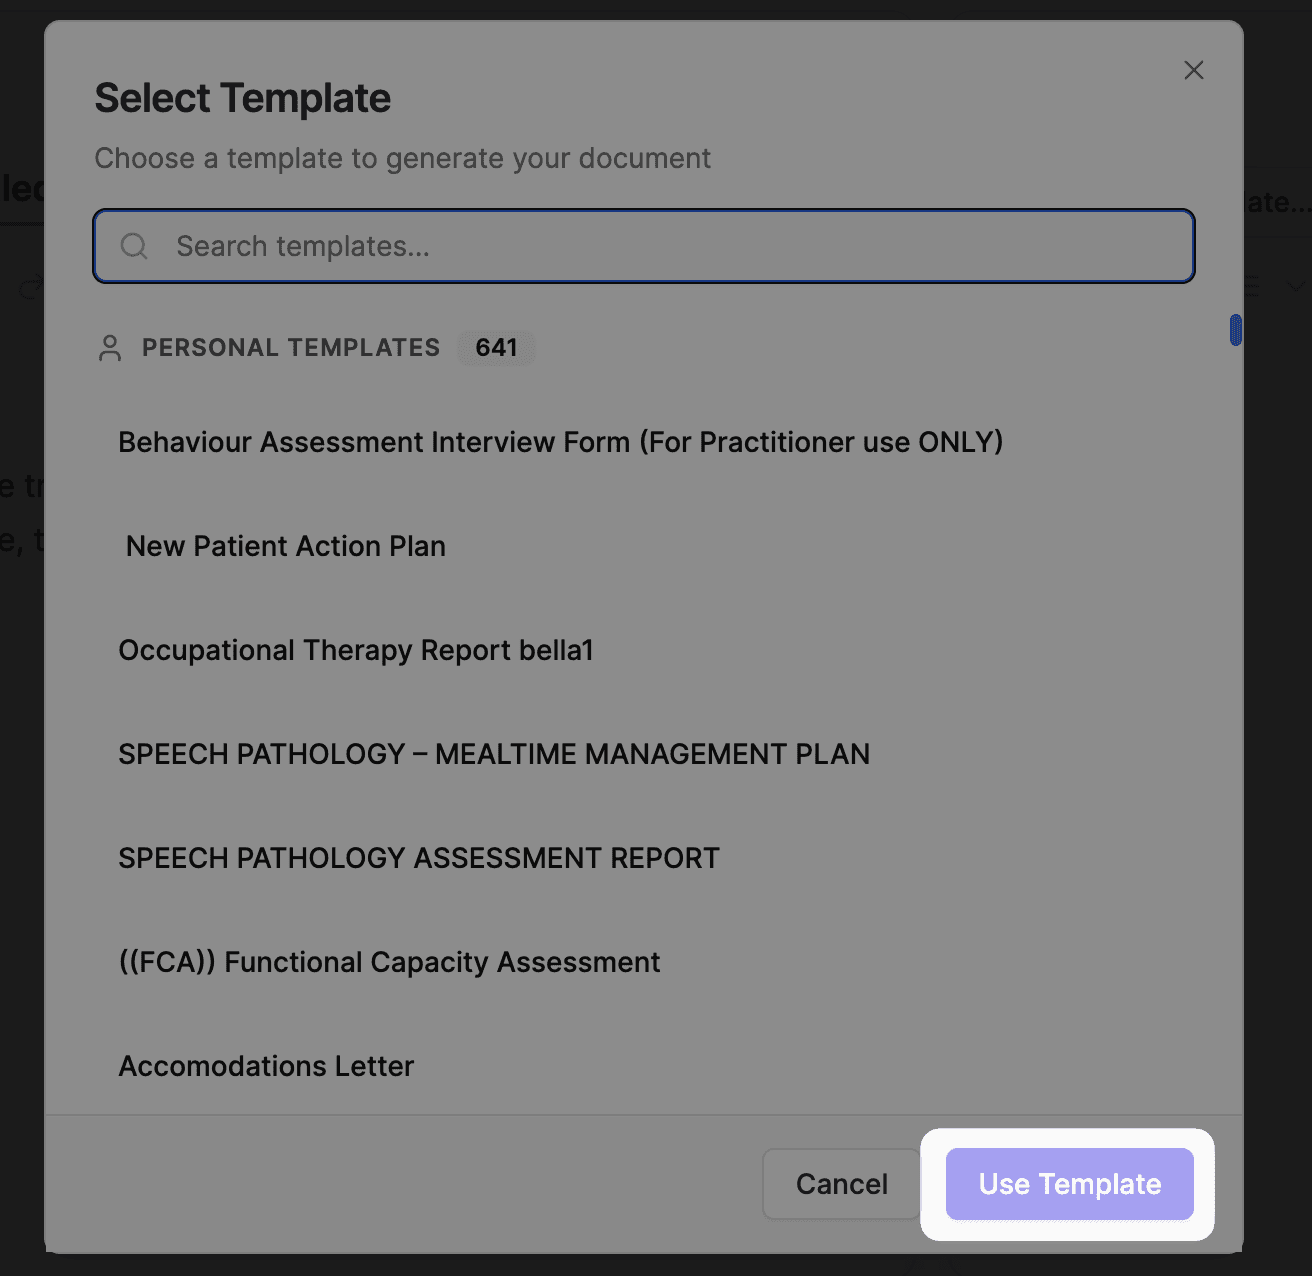
(b) To Generate a Document: I can select the client, select the template and the notes I want Everbility to use and then click generate.

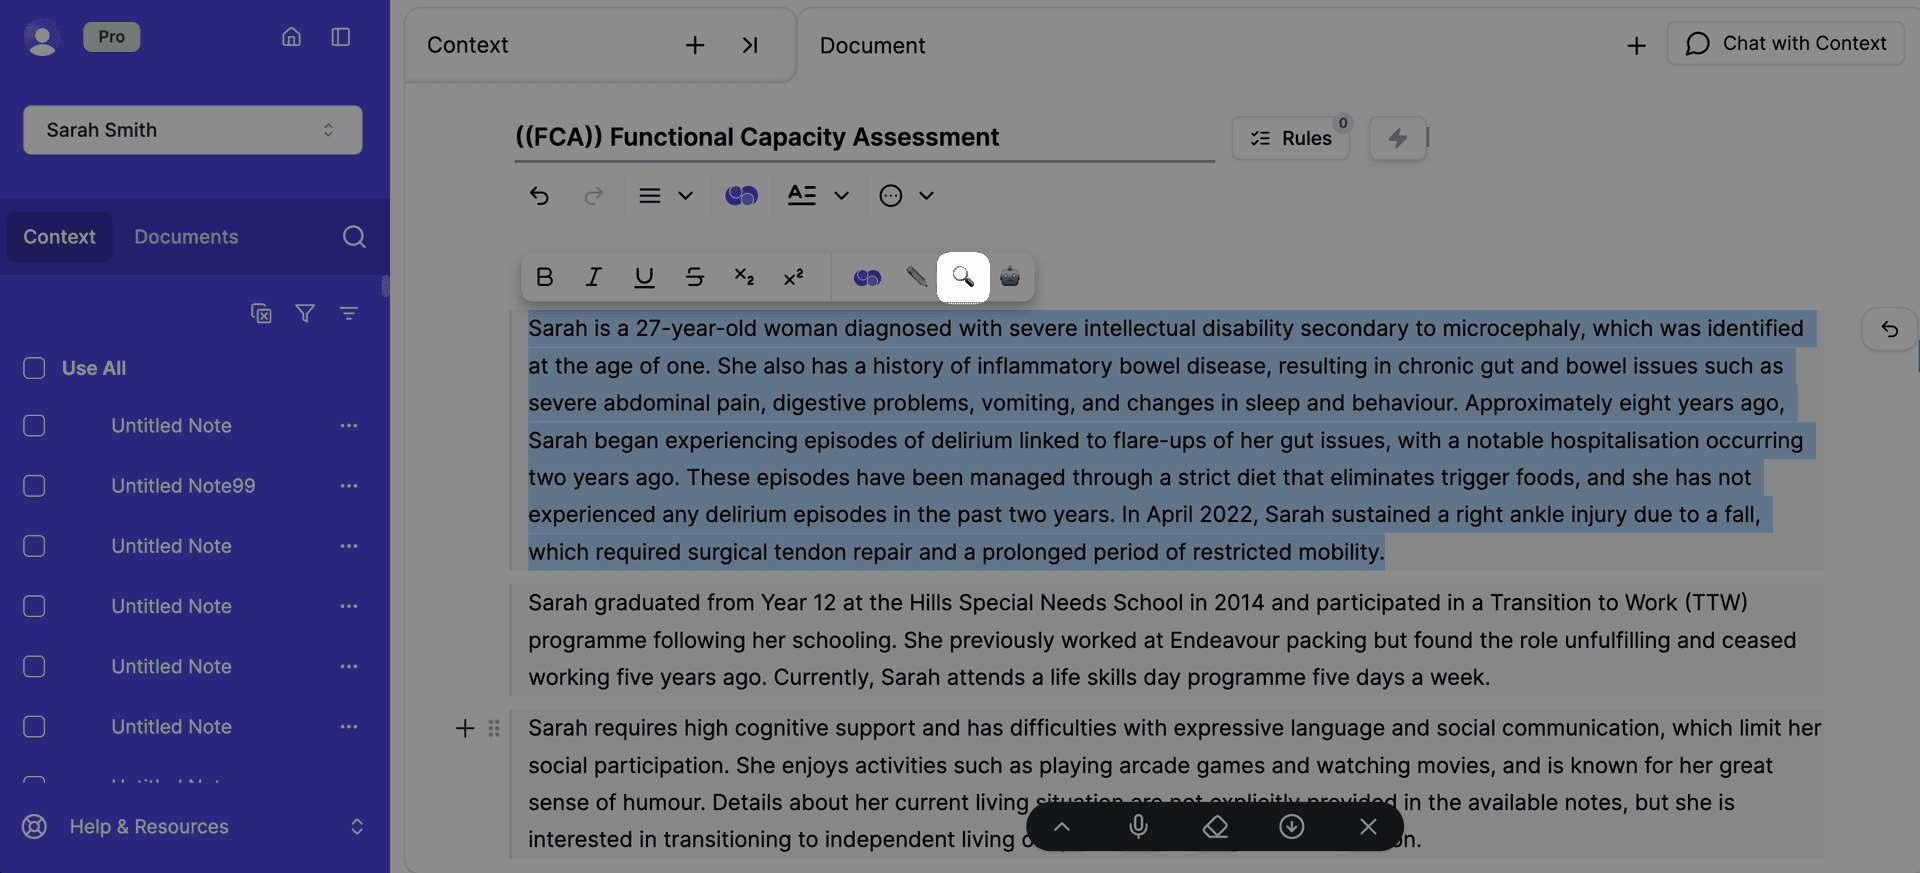
(c) I can edit my document by:
- Typing directly into the document.
- Clicking back on a prompt, editing it, and regenerating a response.
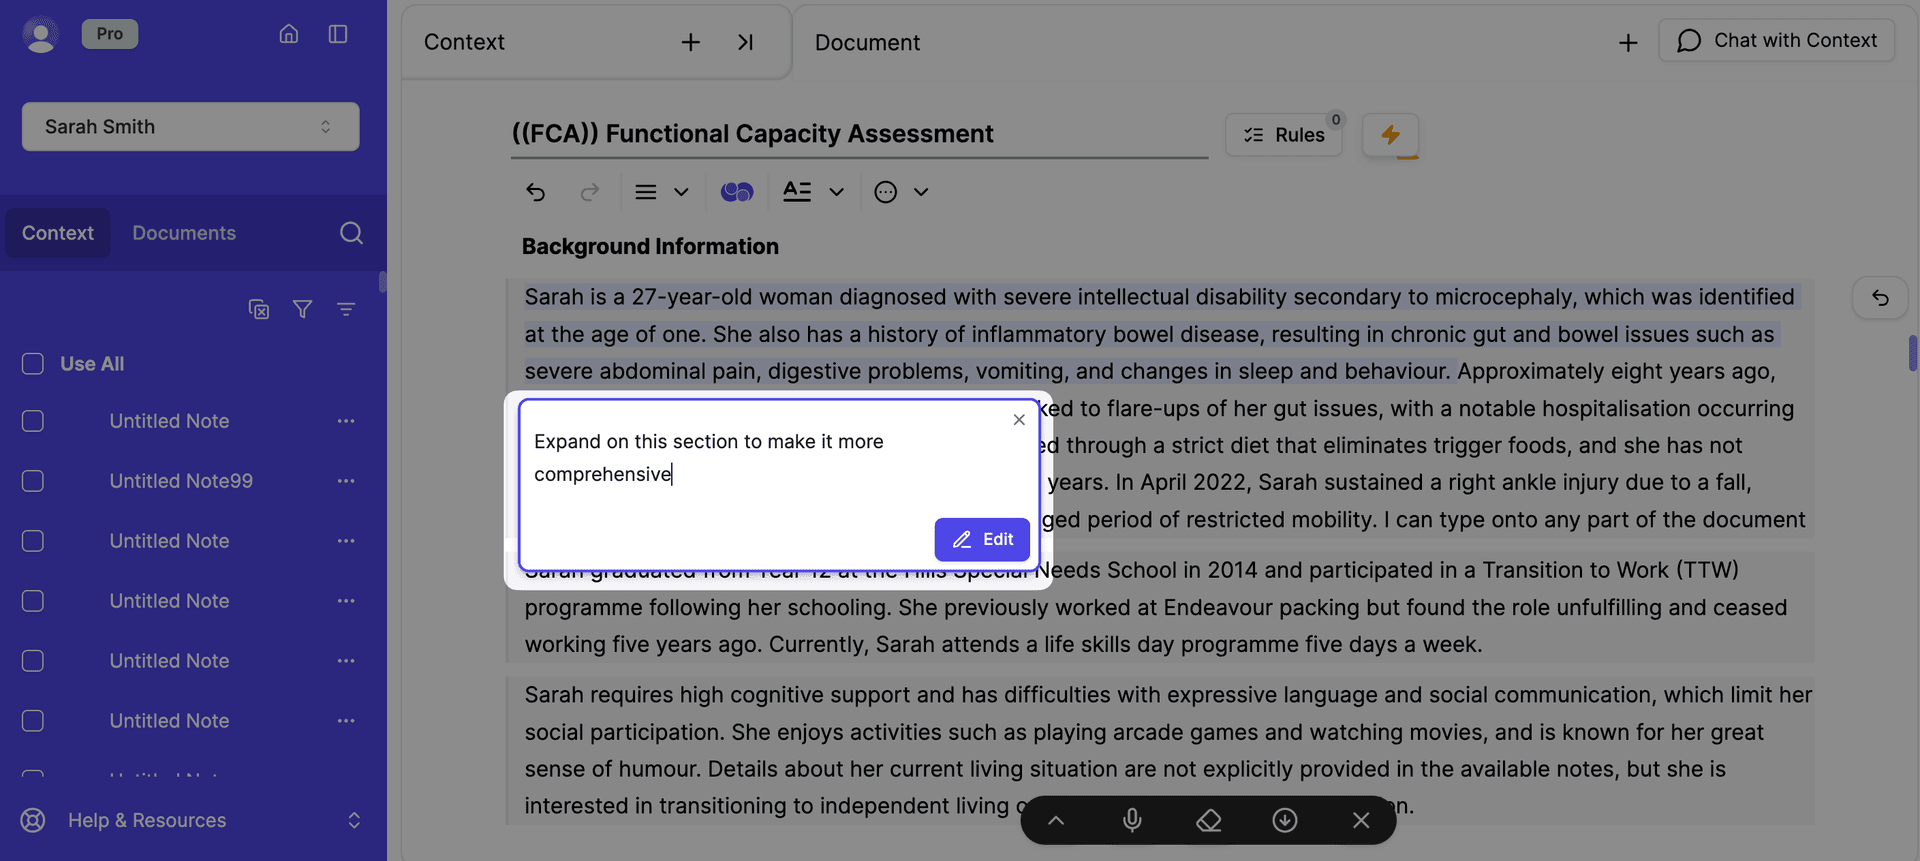
- Using AI to update individual sections (Edit Using AI).
Highlight the text that you would like to edit and click on the pencil icon.
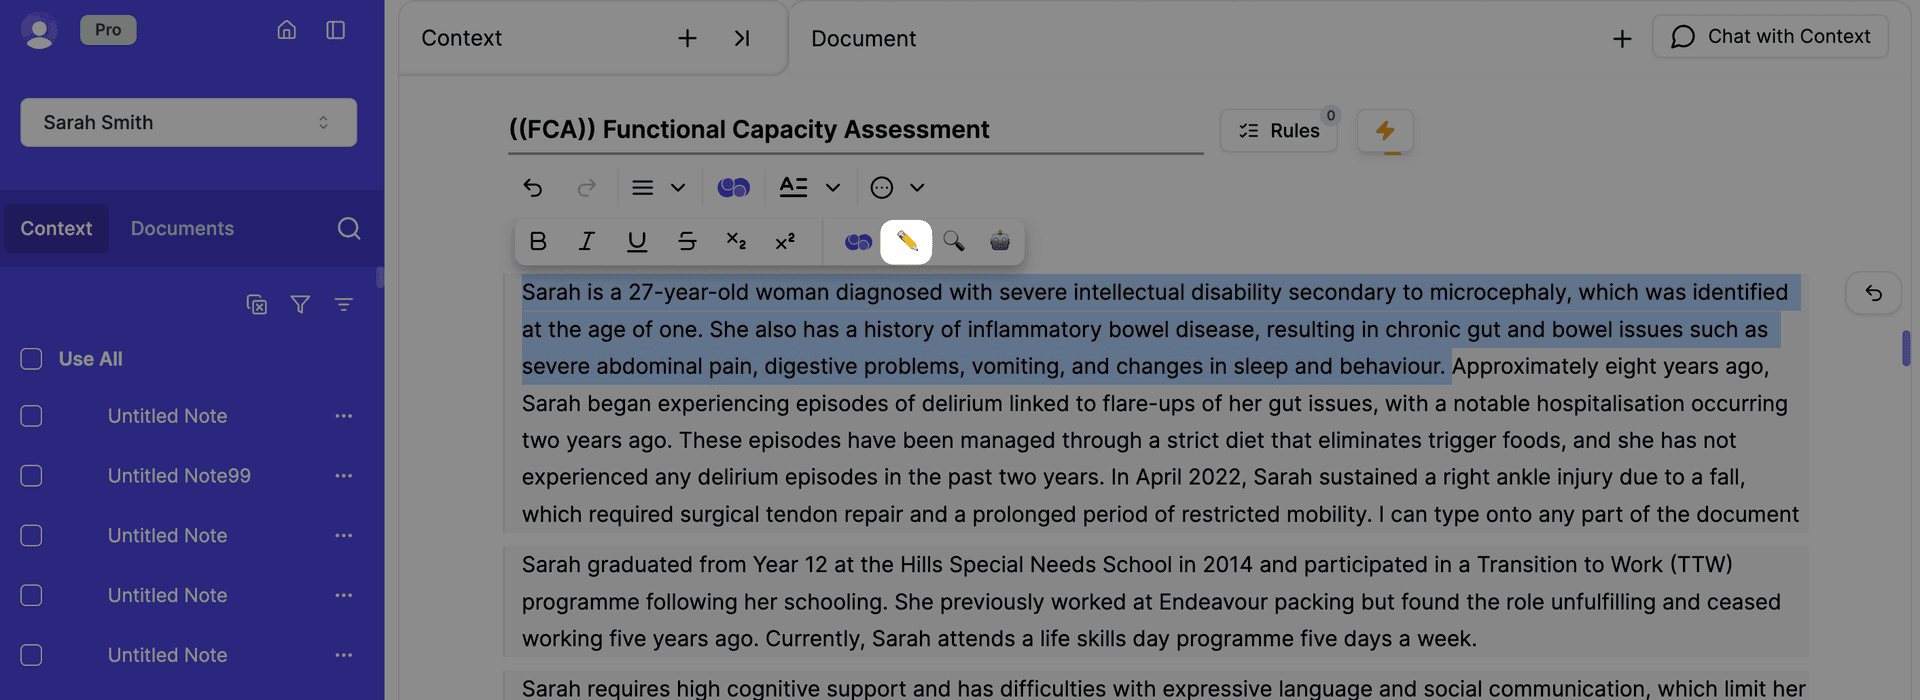
Type your additional instructions in the text box.
(d) I can also use Writer to find research articles or NDIS resources using the Verify AI button: Guide here.
(e) Once ready, I can download the report as a DOCX or PDF or copy it into my clinical software or email.

🎙️ Use Writer to Transcribe and Create a Clinical Note
Stay present in your session — then let AI help with documentation.
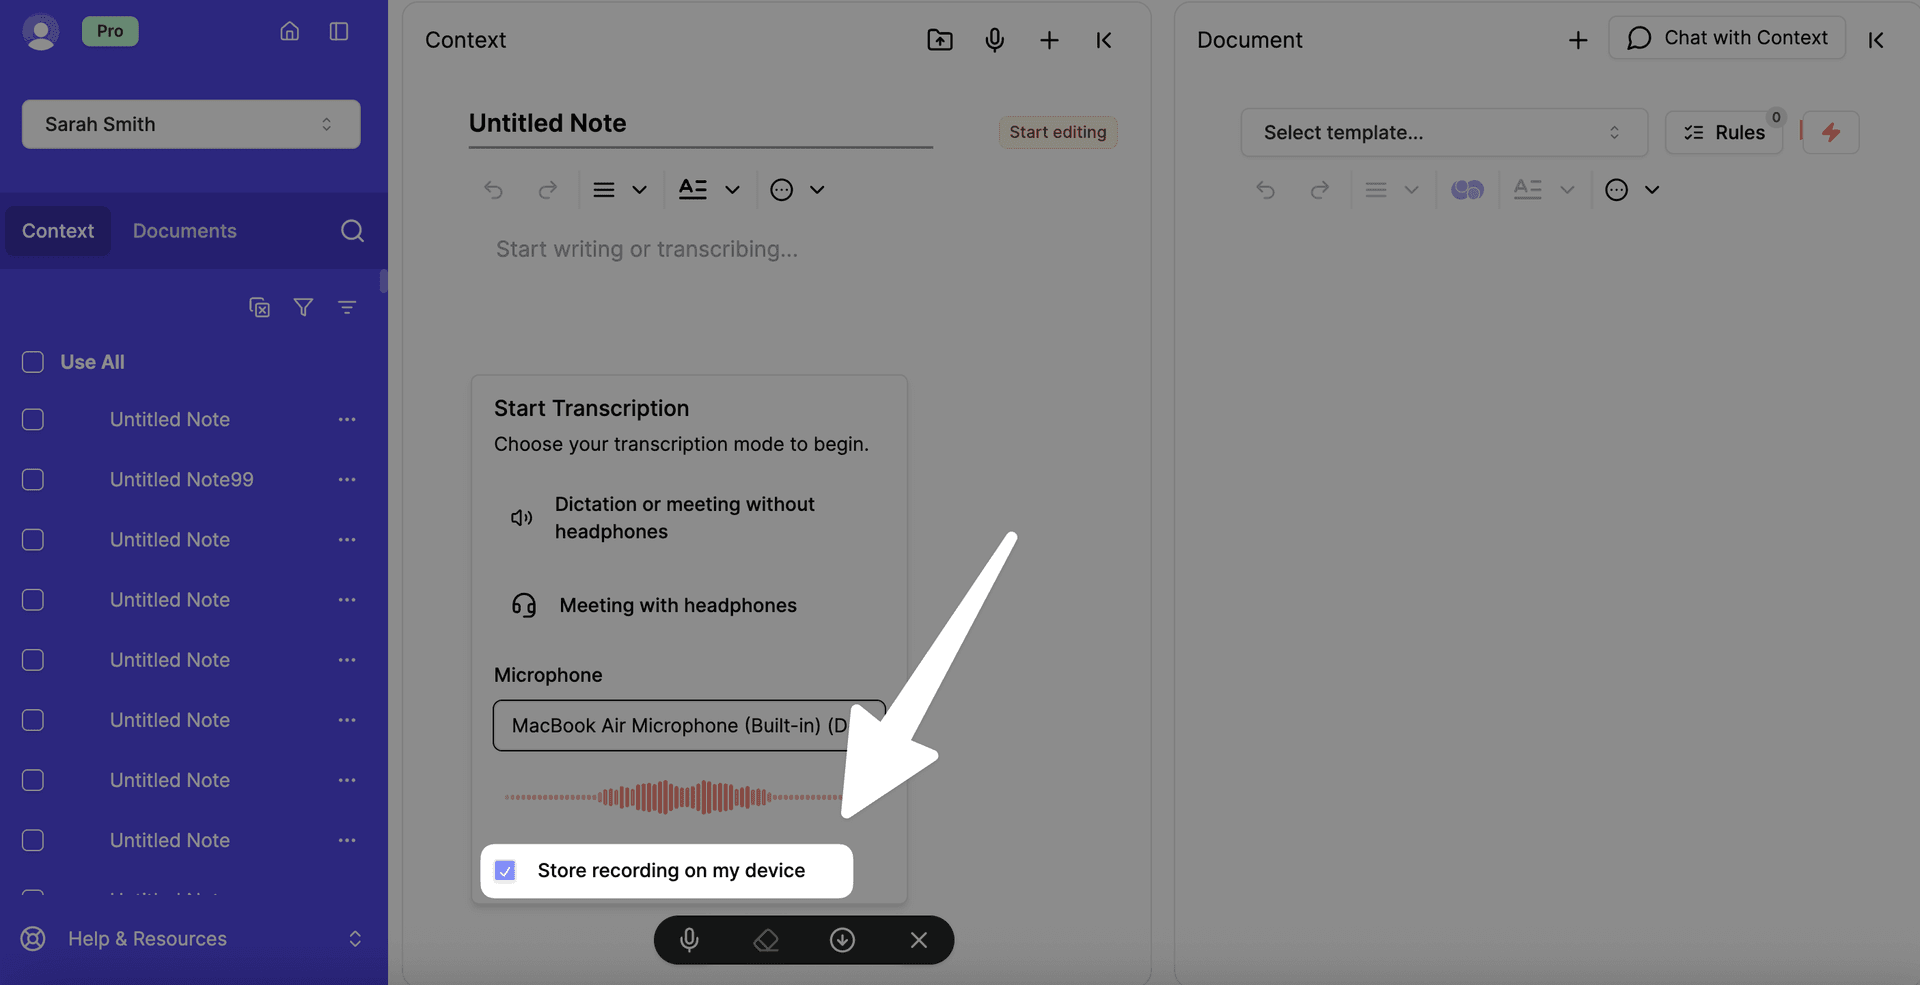
(a) I can click on the microphone icon and select:
- Dictation or Meeting without Headphones = Any session that doesn't include headphones, e.g., face to face meetings, talking session notes aloud
- Meeting with Headphones = Any session that includes headphones, e.g., telehealth sessions, team meetings where headphones are used. Please note: You will then be prompted to select the browser where my video is, e.g., zoom/ teams/ google meet etc.
I can also check my microphone is working and select if I want to store the audio recording on my device (in addition to the words of the transcript)

(b) I can click on the stop recording icon to stop the recording and if I want to restart it, I can click on the microphone icon again.
(c) To generate a SOAP note, I select ‘SOAP Note’ from the dropdown menu.
Looking for other types of clinical notes? Browse more in the Community Templates. See section: ‘Browse Community Library Templates’.
I can then click the lightning bolt icon to stop transcription and generate.
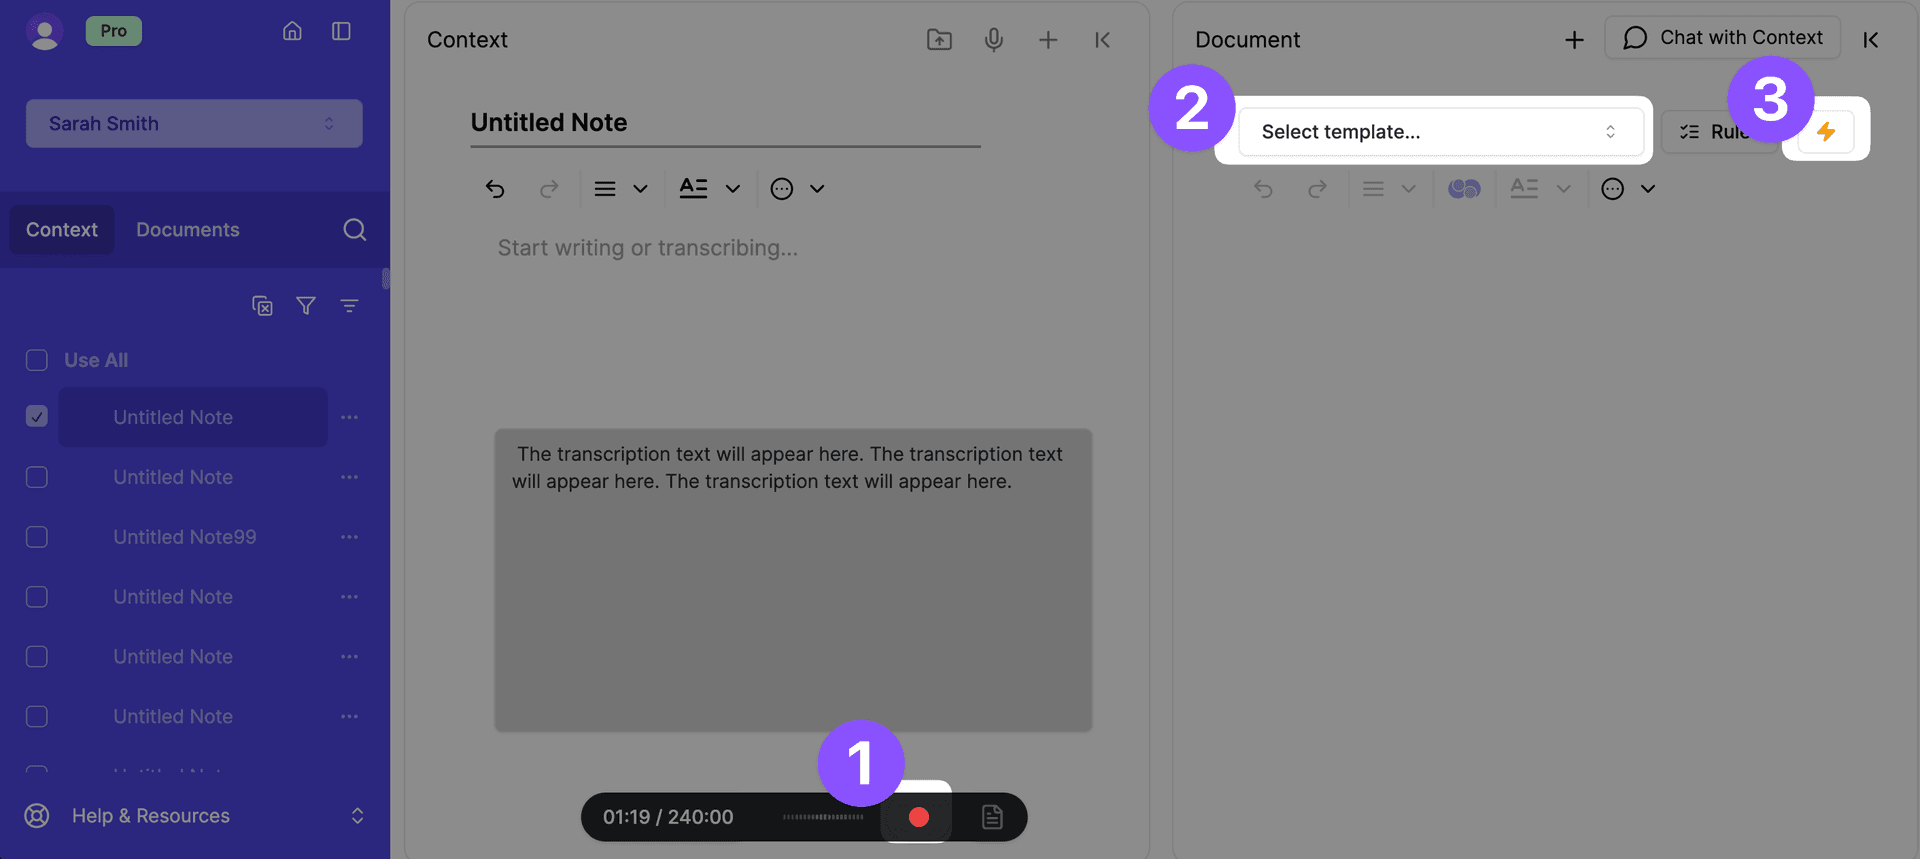
Or, I can use the generate icon at the bottom of the Context panel.
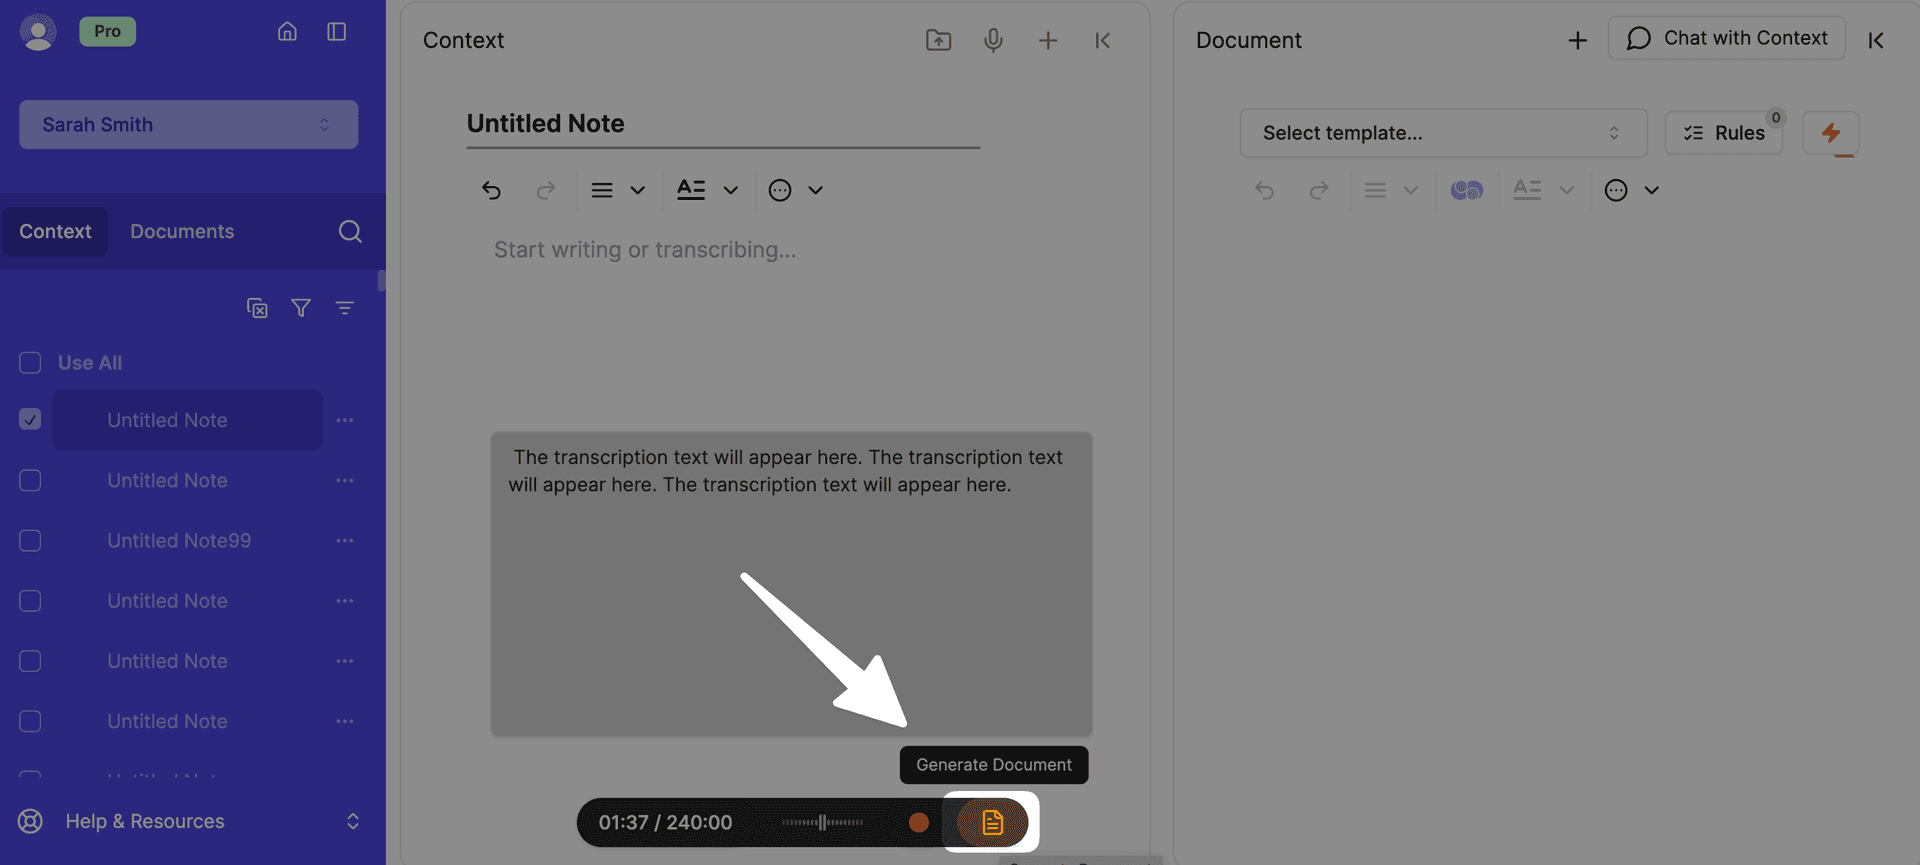
A pop-up will appear where I can choose which template I would like to use and Everbility will automatically convert into the generated document.
(d) I’m not just limited to SOAP notes though! I can choose from other progress note templates, including community templates or I can create my own templates. See under heading ‘Create My Own Template on Everbility’.
📚 Browse Community Library Templates
Save time and access templates created by fellow professionals.
- I can follow these steps to find and save a template in my Templates folder: Community Template Guide
🧩 Create My Own Template on Everbility
Design your own AI-powered templates that reflect your unique approach
I can watch this video to help me create my own template: Template Video
For other support, I can refer to:
I can always reach out to support@everbility.com if I need help with customising templates.
💬 Using Assistant
Let curiosity guide your clinical growth.
I can learn to ask questions and explore ideas using this guide: Ask Questions
For inspiration, I can browse the Prompt Library.
I can use Assistant to find research articles here. Find Research Articles
I can also generate short reports and documents in Assistant too!
Select the notes I want Everbility to use from the purple side menu and enter my request in the text box below. (Alternatively, I can click the microphone icon to speak my request).

- All conversation history is saved in the client’s 'Conversations' tab in Client Data.

🧠 Using the Knowledge Base
Keep important resources at your fingertips.
- I can save web pages and clinical references by typing @ in prompts.
- See how to use Knowledge Base in practice: Knowledge Base Examples
Where is Everything I Have Created on Everbility Stored?
Everything that you have added onto Everbility and created in Everbility is stored under the 'Client Data' button for your client. Think of Client Data as your client's folder on Everbility.
Once clicking on the 'Client Data' button for your client, you can find a series of tabs under your client's name.
Context: Includes any raw information about the client. This might be a diagnostic report you uploaded as a pdf, a brain dump you typed into Everbility, a transcription you created when you recorded a session or information from a Word document that you copy and paste into Everbility.
Documents: Consists of anything you generate in the Everbility tool called Writer. This may be an assessment report, a clinical note, team meeting minutes or something else!
Conversations: Consists of any conversation you have with the Everbility tool called Assistant. This may be brainstorming therapy ideas, session planning, asking particular diagnostic questions or something else!
Recordings: Includes the list of audio recordings, if you have chosen to store recordings onto your device when you click the transcription microphone. (This is labelled '3' in the below image)
If you cannot find something in your client's Client Data button under the above tabs, you may have accidentally linked the information/ report to your 'Uncategorised' client (this is a client in your list) or another client in Everbility. Please reach out to us at support@everbility.com and we can help you problem solve this.
Feeling stuck? Book a demo here